Attribute Based Access Controls (ABAC)
Satori enables you to create dynamic masking or data filtering policy rules using attribute based access controls.
Attribute based access controls or ABAC allows your organization to create attributes in your Identify Provider and then leverage these attributes in Satori.
Satori provides you with several locations throughout the data flow where the ABAC policies can be leveraged. ABAC policy rules enable you to define complex policies that otherwise would require a large number of policy rules.
For example, instead of defining a data filtering rule for each team to only access data in their jurisdiction, with ABAC, the same policy can be defined using a single rule.
For Example
- When deciding which masking profile to apply - If a user does not have the PII Allowed attribute apply the PII Masking profile.
- When deciding which values to filter a table by - If the user does not have the admin=true attribute allow to see values from the allowed_countries attribute.
ABAC Pre-requisites
Before using ABAC controls in your Satori account ensure that you have successfully created a single sign on (SSO) integration between you SSO provider and Satori, and that you have enabled SCIM support with the SSO provider.
To learn more about how to enable SCIM support with your single sign on provider. Refer to the SCIM in the Integrations chapter for more details.
User Custom Attibutes
User attributes are the basis for ABAC. Satori provide you with the ability to customize and manage attributes on the management Console or via the Satori Terraform provider.
If you set custom attributes for a user that conflict with predefined attributes from your IdP, the custom attribute overrides the synced attributes from IdP.
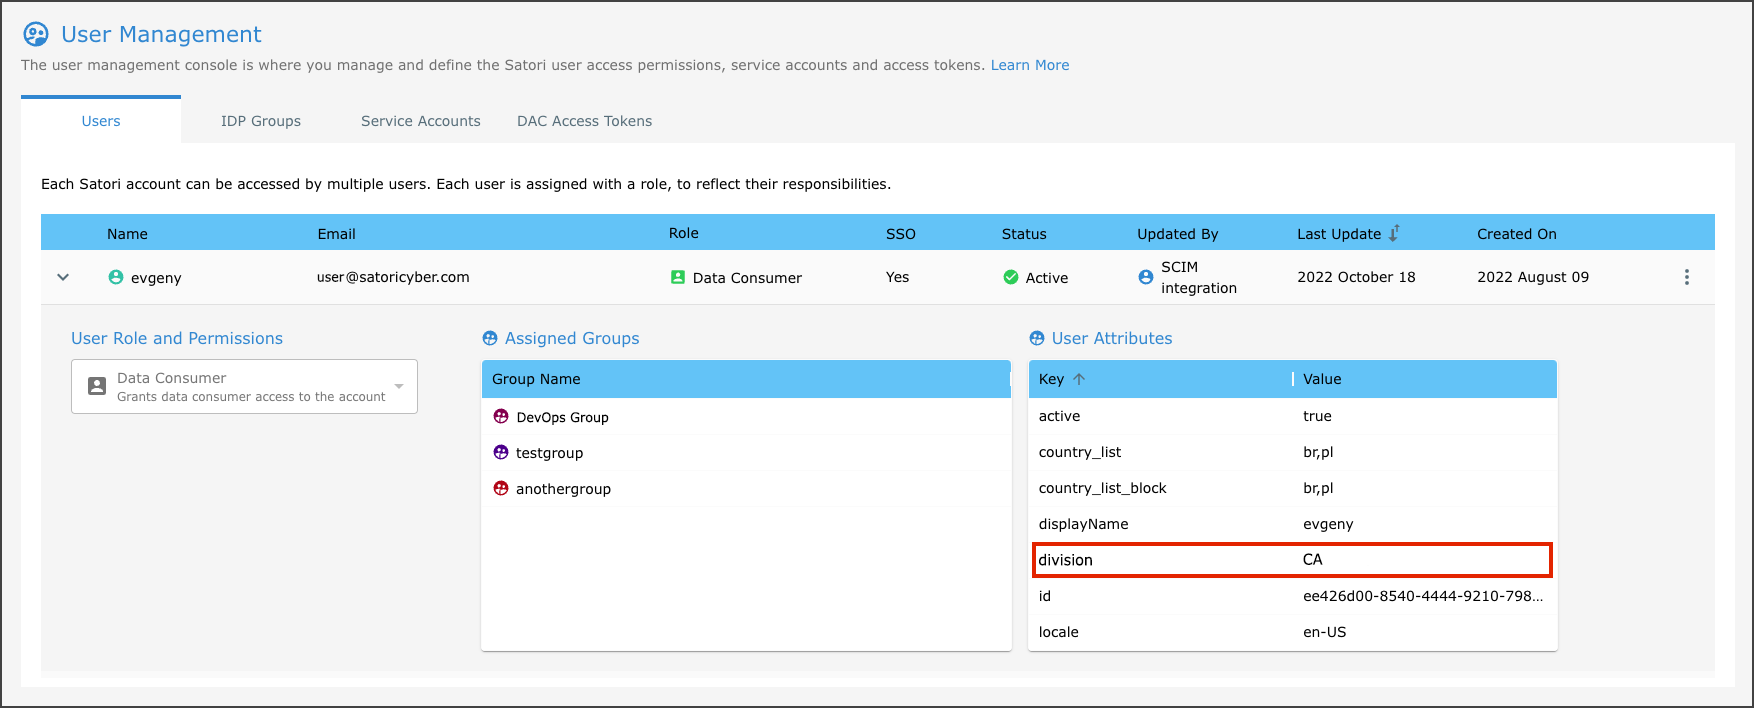
Viewing the SCIM User Attributes in Satori
SCIM users are represented by a green user icon before the user name. In the following example the user that was created using the SSO and SCIM integration support appears below.

To view user attributes simply expand the user in the User Management user row in the table to reveal the Assigned Groups and the User Attributes sub sections. You can now start to leverage the user Attributes in your security logic.
Satori uses the Common Expression Language (CEL). To learn more about CEL review the README file from the following link CEL Read Me.
Syntax
Satori supports three powerful CEL syntax rule types, they are as follows:
Membership
userMemberOfGroup - checks if a user is a member of group.
CEL example: userMemberOfGroup(“groupA”) || userMemberOfGroup(“groupB”)
Has Attribute
userHasAttr - checks if a user has attribute by key.
CEL example: userHasAttr(“attribute_name”)
(Return) Attribute
userAttr - return a user attribute by key, if no key found then return null.
CEL example: ` == “value_of_attribute_name”
CEL example: user.attributes.attribute_name == user.attributes[“attribute_name”]
You can use these types of syntax in your Security Policies, with either Dynamic Masking or Data filtering or with both of them combined together.
Nested Logic Rules
You can also create nested logic rules using parenthesis, boolean OR (“||” ) and boolean AND (“&&”).
For example: (user.attributes.division == user.attributes[“division”]) || (userMemberOfGroup(“admins”) (user.attributes.title ==”CTO”) && (userMemberOfGroup(“admins”)
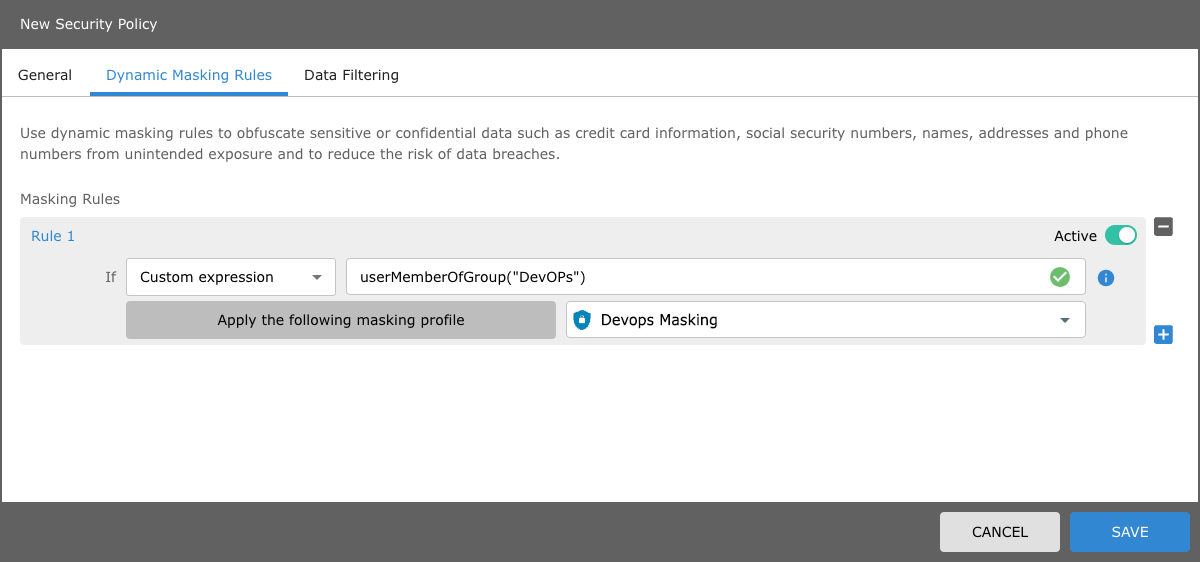
Using ABAC Dynamic Masking
To configure an ABAC dynamic masking rule in a security policy perform the following:
- Open your security policy and select the Dynamic Masking tab.
- Select the advanced mode.
- Then select the custom expression If argument from the drop menu list item.
- Now you can use one of the three syntax CEL rule types to trigger a particular masking rule.
If the user is a member of the DevOps group, your CEL rule should appear as follows:
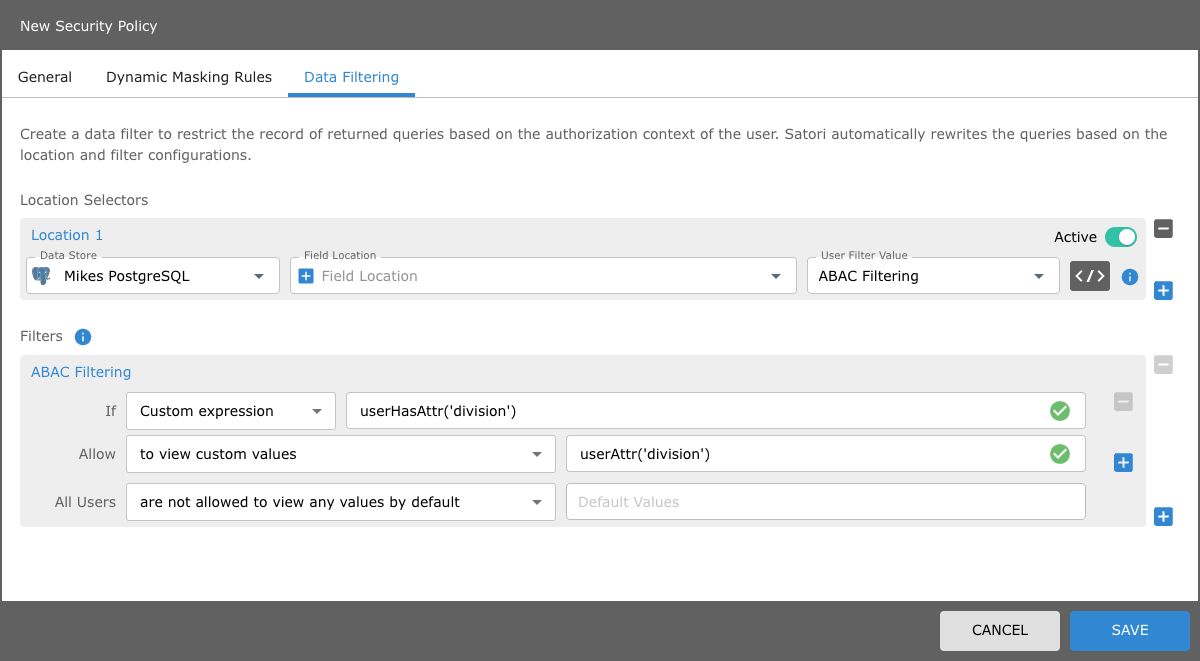
Using ABAC Data Filtering
To configure an ABAC data filtering rule in a security policy perform the following: If for example there is an SSO user that has a Division user attribute, that is set to CA.
To configure the row level filtering rule using this user attribute, configure the location filter as follows:
- In your security policy and select the Data Filtering tab.
- Select the relevant Data Store, Field Location and User Filter Value.
- Then select the custom expression If argument from the drop menu list item.
- Now enter the userAttr("division")
Your Row level filter using userAttr("division") should appear as follows:
Viewing the Results
If the user has an SSO attribute called “division”, then only show the rows/records where postgres.public.people.state == the value of that user’s division attribute (CA).
When a user tries to connect to this postgres data, they will only see rows where the state = california (CA).
