Deploy Satori CH on AWS EKS
The following section describes the main components of the Satori Customer Hosted (CH) platform and how to deploy them on AWS EKS.
Introduction to Satori CH for AWS EKS
The Satori CH platform consists of two main components:
- The Satori Management service, maintained by Satori.
- The Satori Customer Hosted (CH) Data Access Controller (DAC), a Kubernetes container that is either consumed as a service or deployed on an AWS Elastic Kubernetes Service (EKS) inside the customer's VPC.
Deploying the Satori CH DAC
Deploy the Satori CH DAC in the same public cloud region as the data stores that the Satori CH DAC is meant to protect.
For example, customers using Redshift on AWS us-east-1 should deploy the Satori DAC on a VPC in the same region (AWS us-east-1).
Multi-Region Deployments
For customers who operate data stores in multiple regions, a Satori CH DAC should be deployed for each separate region.
Satori VPC Deployment Architecture on AWS EKS
The following two diagrams illustrate the Satori architecture when deployed in a customer's virtual private cloud (VPC) on AWS.
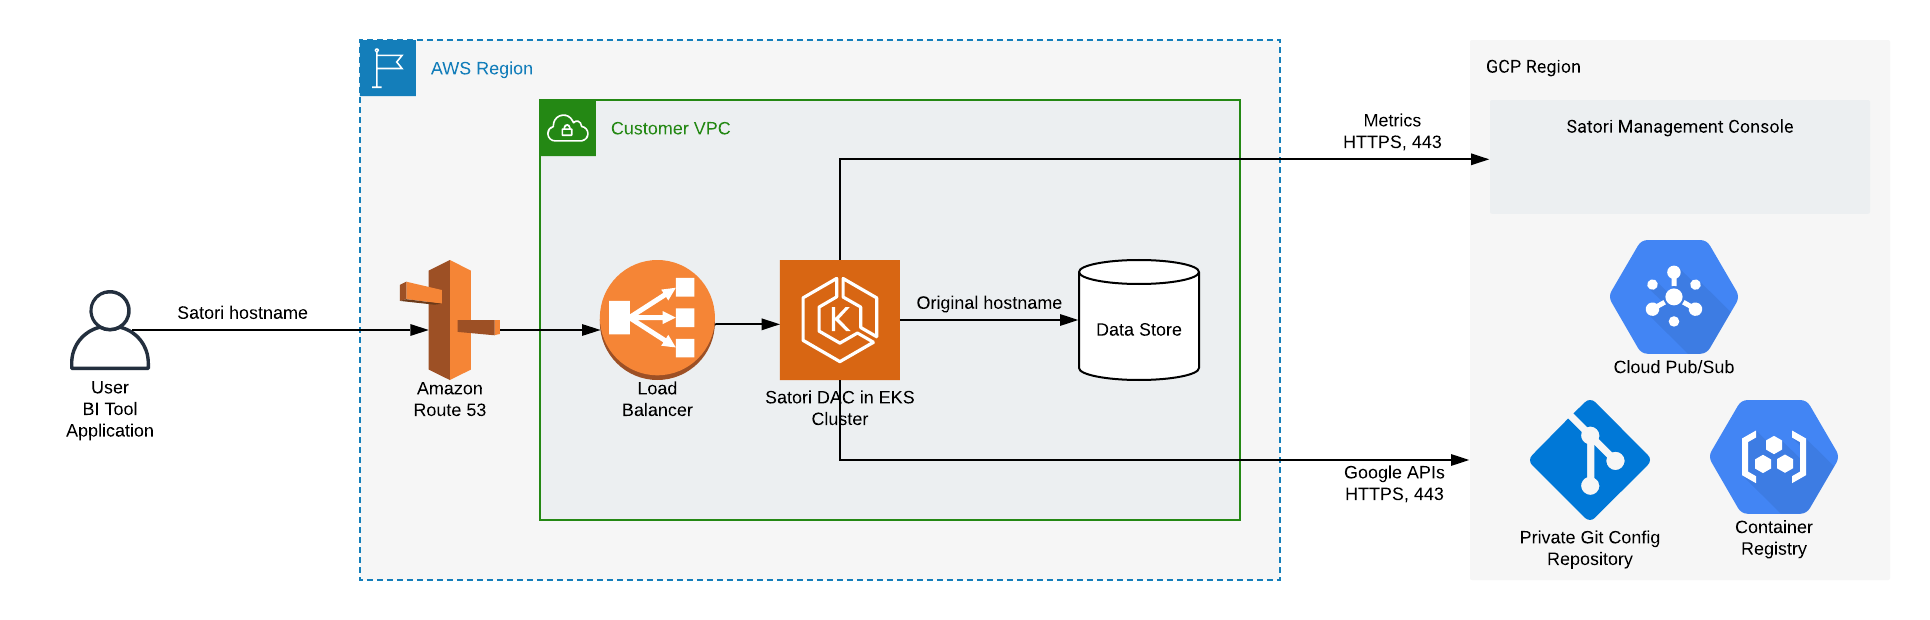
Illustration 1 - High Level Satori Deployment on AWS EKS Architecture
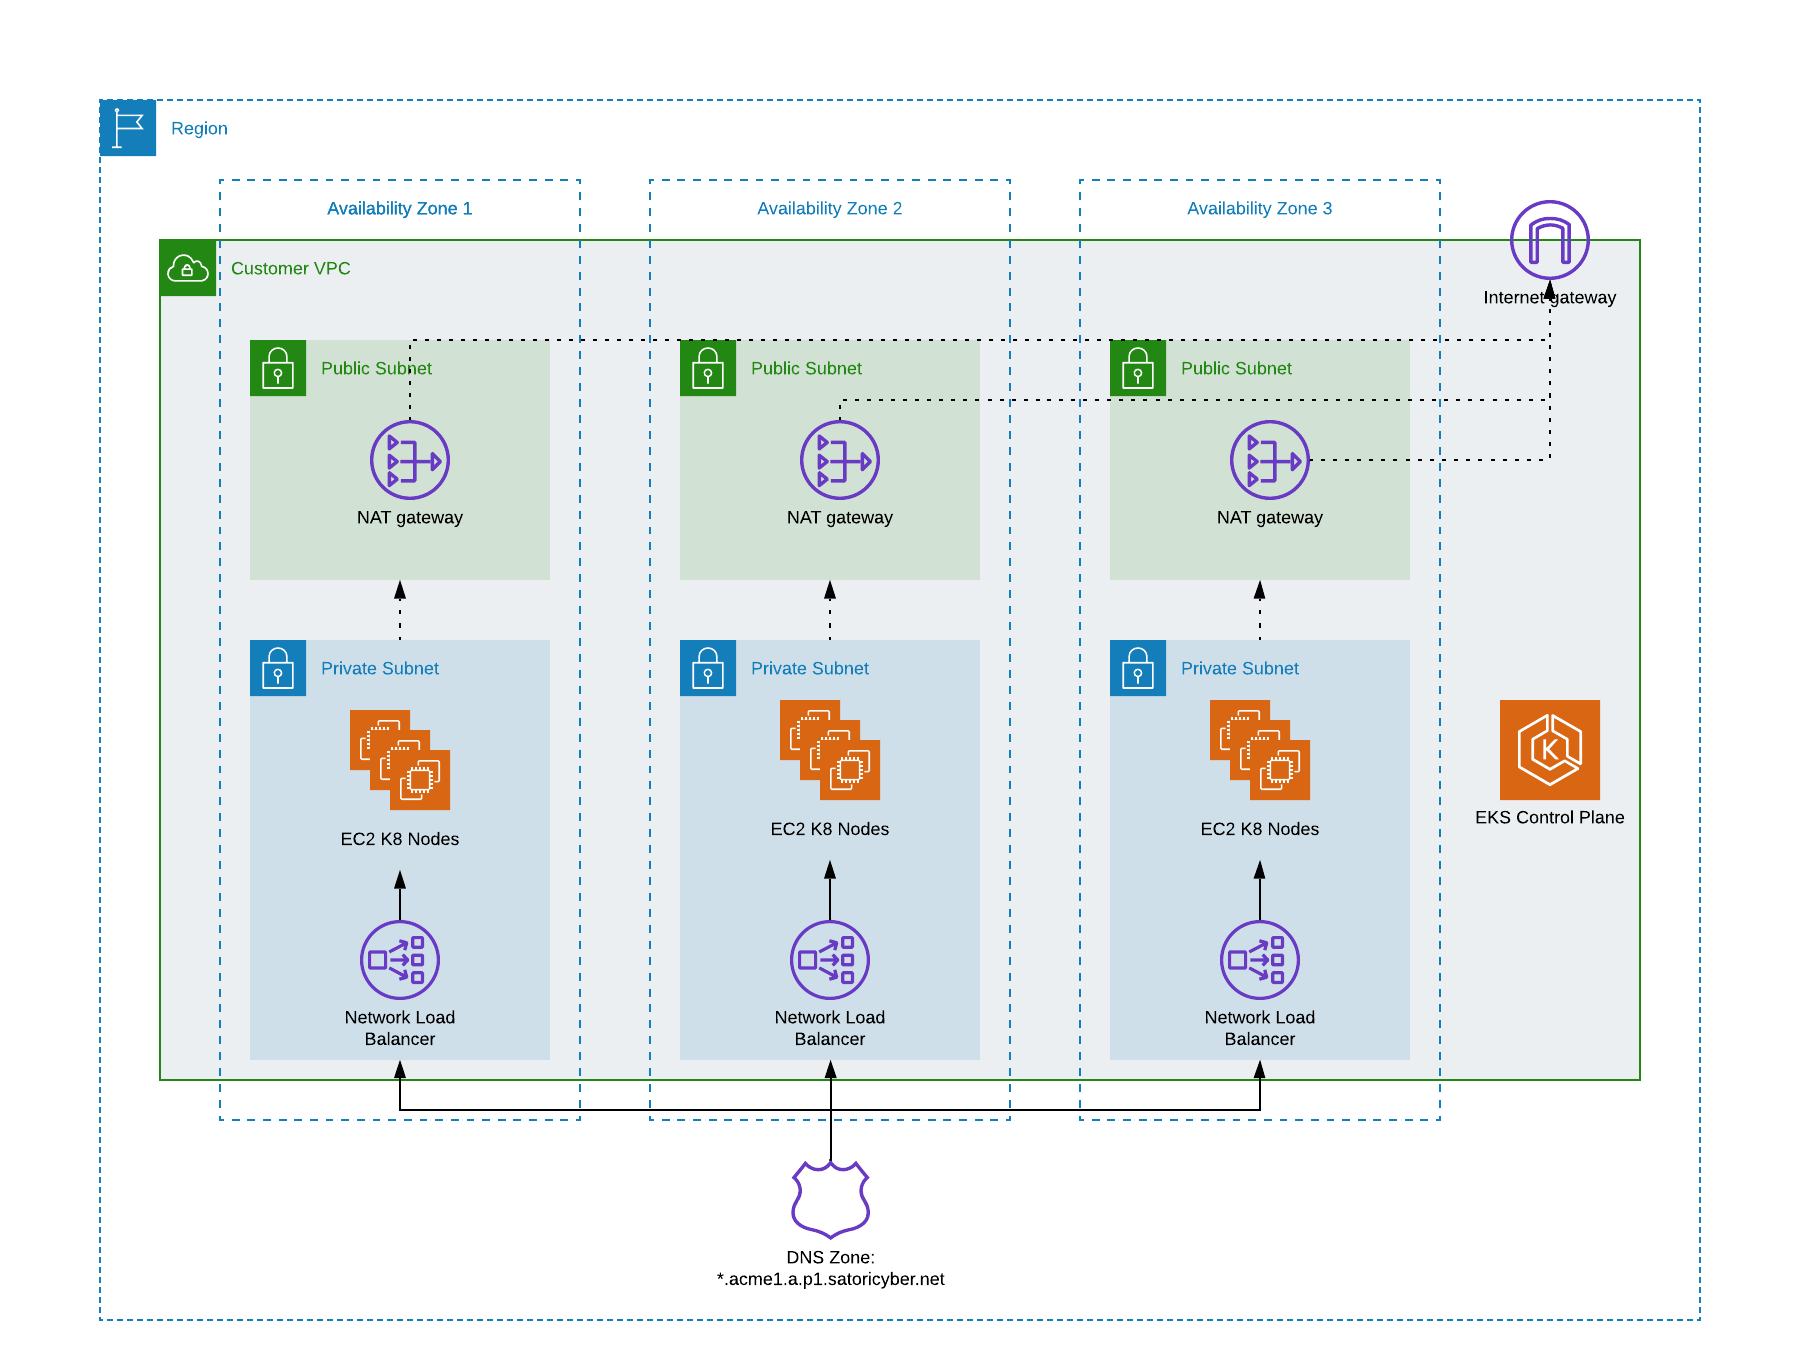 Illustration 2 - Kubernetes Cluster Architecture
High level Deployment Steps
Satori provides assistance for the following deployment steps for a Customer Hosted DAC, including:
- Customer Task - Prepare the network for deployment.
- Customer Task - Prepare the kubernetes cluster.
- Customer Task - Deploy the Satori DAC.
- Satori Task - Reference a new CNAME for the DAC
- Operational Task - Configure a self-hosted DNS and SSL for the DAC

Satori CH DAC Network Configuration
The Satori CH DAC requires the following network path configurations:
- User Connection to the Satori DAC - Users connect to data stores via the Satori DAC, therefore a network path from users to the Satori DAC is required.
- Satori DAC Connection to the Data Store - the Satori DAC receives queries from users and then sends them to the data stores it protects, so a network path from the Satori DAC to the data stores is required. Typically, this is established by deploying the Satori DAC in the same VPC as the data stores it protects and ensuring that the AWS security groups allow access from the Satori DAC to the data stores.
- Verify the egress traffic to the following host addresses: app.satoricyber.com, .google.com, .googleapis.com and us-docker.pkg.dev on port 443 - Satori uses several services from the Google cloud platform (GCP) as well as a GIT repository that contains the Satori DAC's configuration files, a secret manager for secure storage of secrets and a messaging service to publish data access metadata that is shared with the management console. The full list of fields that are sent is available here: Metadata Shared by Data Access Controllers with the Management Console.
- Verify the egress traffic to the following host addresses: cortex.satoricyber.net, alert1.satoricyber.net, alert2.satoricyber.net, alert3.satoricyber.net - the product telemetry (metrics) are uploaded here.
Private or Public Facing Data Access Controller
You can choose to deploy a private, VPC-only facing Satori CH DAC, or a public, internet-facing Satori CH DAC.

The following section describes how to deploy a typical EKS cluster.
Prerequisites
To deploy an EKS cluster, ensure the following access privileges and third party products are installed and made available:
- Administrator Level Access to the Following AWS Services - IAM, VPC, NAT gateway, Internet gateway, Network Load Balancer, CloudWatch, KMS, EKS, EFS (only for Fargate-based deployments).
- Helm 3 is installed on the Command Line - To verify helm is installed run the following command:
helm version. To download helm go Helm. - kubectl is installed on the Command Line - To verify kubectl is installed run the following command:
kubectl version. To download kubectl go to Kubernetes Tool Installations. - AWS Command Line Tools are Installed - To verify that aws cli is installed and then run the following command:
aws --version. To download aws cli go to the following AWS amazon CLI Installation.
Recommended Cluster Specification
- Creating Nodes - 3 m6i.large or similar EC2 nodes. Satori recommends that you create three node groups. Since Satori workloads use persistent volumes, we strongly recommend to create a single node group in each availability zone. See here why this is important.
- Disk Space Allocation -20Gb Ephemeral storage in every node. By default, AWS creates nodes with 20GB total gross disk space. This means that there is only 18GB net disk space for the ephemeral storage (the volatile temporary storage attached to your instances). Satori recommends that you create nodes with 50 GB disk space.
- Load Balancer Controller - AWS Load Balancer Controller. See here for instructions.
- EBS CSI Driver - AWS Elastic Block Storage (EBS) CSI Driver. Note: This component is required in EKS 1.23 and higher. See here for instructions.
- Autoscaling the Cluster- Satori recommends to install the cluster autoscaler to allow the auto scale nodes if needed. See here for instructions
- Subnet Configuration - 3 public subnets, one in each availability zone with NAT gateway deployed or any similar solution for the outgoing connectivity to the Internet. For example a transit gateway to another VPC.
- Cluster Scaling - 3 private subnets, one in each availability zone. Each EC2 node will require around 60 IP addresses. To ensure the cluster can scale to multiple EC2 nodes per availability zone, and to properly handle failover across availability zones, choose subnets with at least 400-500 IP addresses.
- CNI Plugin Version - The EKS cluster must have the CNI plugin version is 1.8.0 or later.
Setting Up a Kubernetes Cluster on EKS
Satori recommends using the Satori eksctl tool to create the EKS cluster.
- Cloning the Git repo - Clone the eksctl_tool Github repository.
git clone git@github.com:SatoriCyber/dac-tools.git. - Bootstrap Cluster - Go into the
eksctl_tooldirectory,cd eksctl_tool. - Deploying the Cluster - To deploy the cluster in an existing VPC, edit the properties in the
create-cluster.shscript for your AWS region, VPC and subnets. To deploy the cluster to a new VPC, change theEXISTING_VPCproperty tofalse. For more information go here. - Authenticating the AWS Account - Before running the
create-cluster.shscript, ensure that the AWS CLI on the terminal is authenticated to the correct AWS account by running the following command and validating the output:aws sts get-caller-identity. - Running the Script - Run the
create-cluster.shscript. - Verify the YAML File - The script will create an AWS CloudFormation YAML file that describes the resources that will be created. Verify the YAML file is correct and press
yesto continue. It may take up to one hour to create the cluster and VM nodes. - Generating Credentials - After the cluster has been created, you need to generate credentials to access it from the command line. Run the following command:
aws eks updatekube-config --region <REGION> --name <CLUSTER_NAME>. For example:
aws eks update-kubeconfig --region us-east-1 --name satori-dac-1
- To test that you have access to the cluster run the following command:
kubectl get pods -A. You should get an output similar to the following:
NAMESPACE     NAME                                                         READY   STATUS    RESTARTS   AGE
kube-system   aws-load-balancer-controller-bf9bdccb6-fhzpx                 1/1     Running   0          1m
kube-system   aws-load-balancer-controller-bf9bdccb6-sbs7k                 1/1     Running   0          1m
...
NOTE: Once the Satori helm chart is deployed on the cluster, Kubernetes will create a network load-balancer to distribute traffic across the Satori proxy pods. To ensure Kubernetes chooses the right subnets for the load-balancer, set the following tag on each subnet.
For private-facing DACs, set the following tag on each private subnet the cluster is deployed on:
Key: kubernetes.io/cluster/<CLUSTER_NAME>
Value: shared
Key: kubernetes.io/role/internal-elb
Value: 1
For public-facing DACs, set the following tag on each public subnet the cluster is deployed on:
Key: kubernetes.io/cluster/<CLUSTER_NAME>
Value: shared
Key: kubernetes.io/role/elb
Value: 1
For more information see EKS VPC subnets discovery.
IMPORTANT NOTE: by default, AWS creates the API server endpoint of the Kubernetes cluster to be accessible from any IP address, to allow you to interact with the cluster using tools such as kubectl. Satori recommends to limit access to the API server endpoint. For more information see cluster endpoint documentation.
Testing Installed EKS
- Satori provides a tool for verifying kubernetes prerequisites, for more info please see the test_kubernetes tool
- Satori provides a tool for verifying aws infrastructure prerequisites, for more info please see the test_aws_settings tool

Prerequisites
- Helm 3 is installed on the Command Line - To verify helm is installed run the following command:
helm version. To download helm go Helm. - kubectl is installed on the Command Line - To verify kubectl is installed run the following command:
kubectl version. To download kubectl go to Kubernetes Tool Installations. - Administrator level access to the Kubernetes cluster
- Kubernetes cluster should meet the recommended specification as described here
Deploying the Satori Helm Chart on the Cluster
The Satori helm chart is available in a deployment package which you download from the Satori management console for first time installation of the DAC. Follow these steps to download and deploy the deployment package:
-
Login to the Satori management console at Satori Management Console.
-
Go to Settings, Data Access Controllers and select the DAC to deploy to. Please contact Support if a new DAC needs to be created.
- Select the Upgrade Settings tab and download the recommended deployment package.
- Extract the deployment package and open a terminal window to the directory where the deployment package was extracted. For example:
tar -xf satori-dac-1.2405.2.tar
cd satori-2405
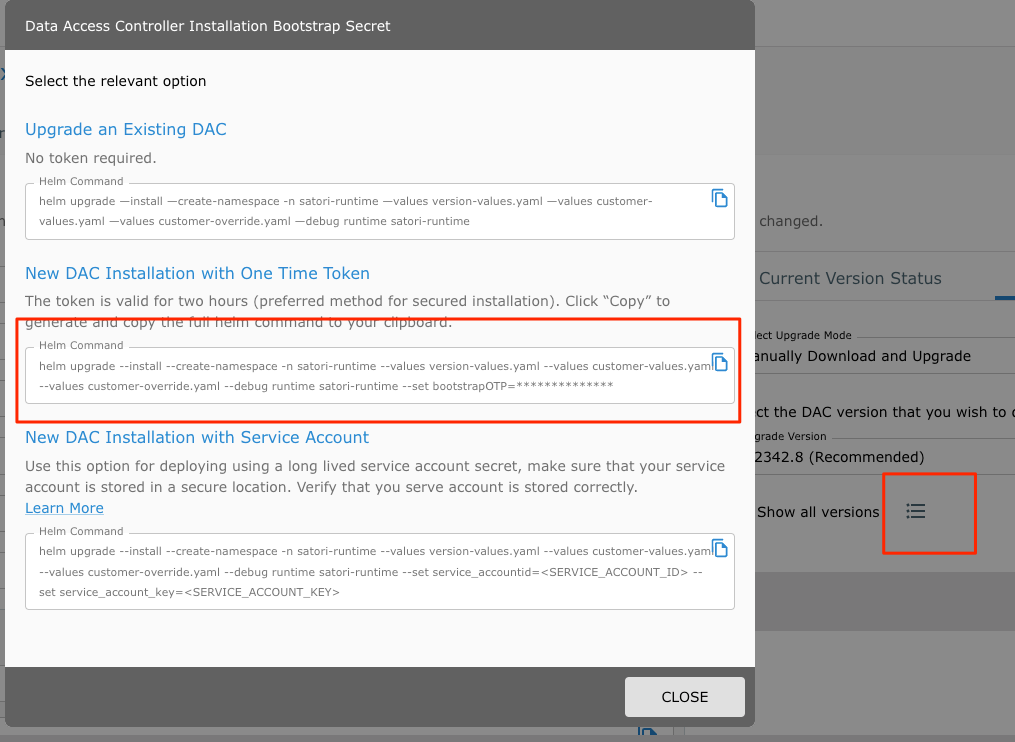
- Run the command (this command is required only once during the first installation):
kubectl apply -f runtime-prometheus-server.yaml
- Run the main DAC install command:
cd satori-runtime
helm upgrade --install --create-namespace -n satori-runtime --values version-values.yaml --values customer-values.yaml --values customer-override.yaml --set bootstrapOTP=<OneTimePassword> runtime .
Note: The one-time password is auto generated when you copy the install command from the Satori Management Console. The OTP is required only for the first time DAC installation.
The one-time password is valid for one hour and can be used only one time.
Creating a DNS Zone for the Cluster
Satori generates a unique hostname for each data store that it protects in a DNS zone that is unique for each DAC.
For private-facing DACs, create a private DNS zone on the AWS Route53 or any other organizational DNS service. This step is only required for private-facing DACs.
- This might be required for highly restricted networks where your organization does not want to publicly broadcast DNS or name resolution.
For public-facing customer-hosted DACs, Satori hosts the DNS zone.
- This is useful for organizations that want to broadcast the Satori hostnames, this maximizes for database client convenience.
For public DNS support, once your DAC has been deployed, contact Satori DevOps and we will add the CNAME entry for your new DAC. At this point your installation should be complete and you can begin testing connections to your databases.
For private DNS zone management, to add the record in your DNS zone perform the following steps:
- Login to the Satori management console at Satori Management Console.
- Go to Settings, Data Access Controllers and select the DAC.
- Copy the value in the DAC Domain field, this will be the root of the DNS zone.
- The DNS zone should point to the AWS load balancer that is deployed in front of the Satori proxy service. To obtain the address of the load balancer run the following command:
kubectl get service satori-runtime-proxy-service -n satori-runtime
NAME                           TYPE           CLUSTER-IP       EXTERNAL-IP                                                                     PORT(S)                                                                                                                                                                                                                                                  AGE
satori-runtime-proxy-service   LoadBalancer   172.20.135.199   k8s-satoriru-satoriru-b8321e97a-3790e137d5d9ef3c.elb.us-east-1.amazonaws.com   5432:30936/TCP,5439:30864/TCP,1433:32722/TCP,3306:31923/TCP,443:30833/TCP,80:31347/TCP,12340:31123/TCP,12341:30752/TCP,12342:31377/TCP,12343:30646/TCP,12344:32062/TCP,12345:31472/TCP,12346:30770/TCP,12347:32501/TCP,12348:31104/TCP,12349:32005/TCP   24h
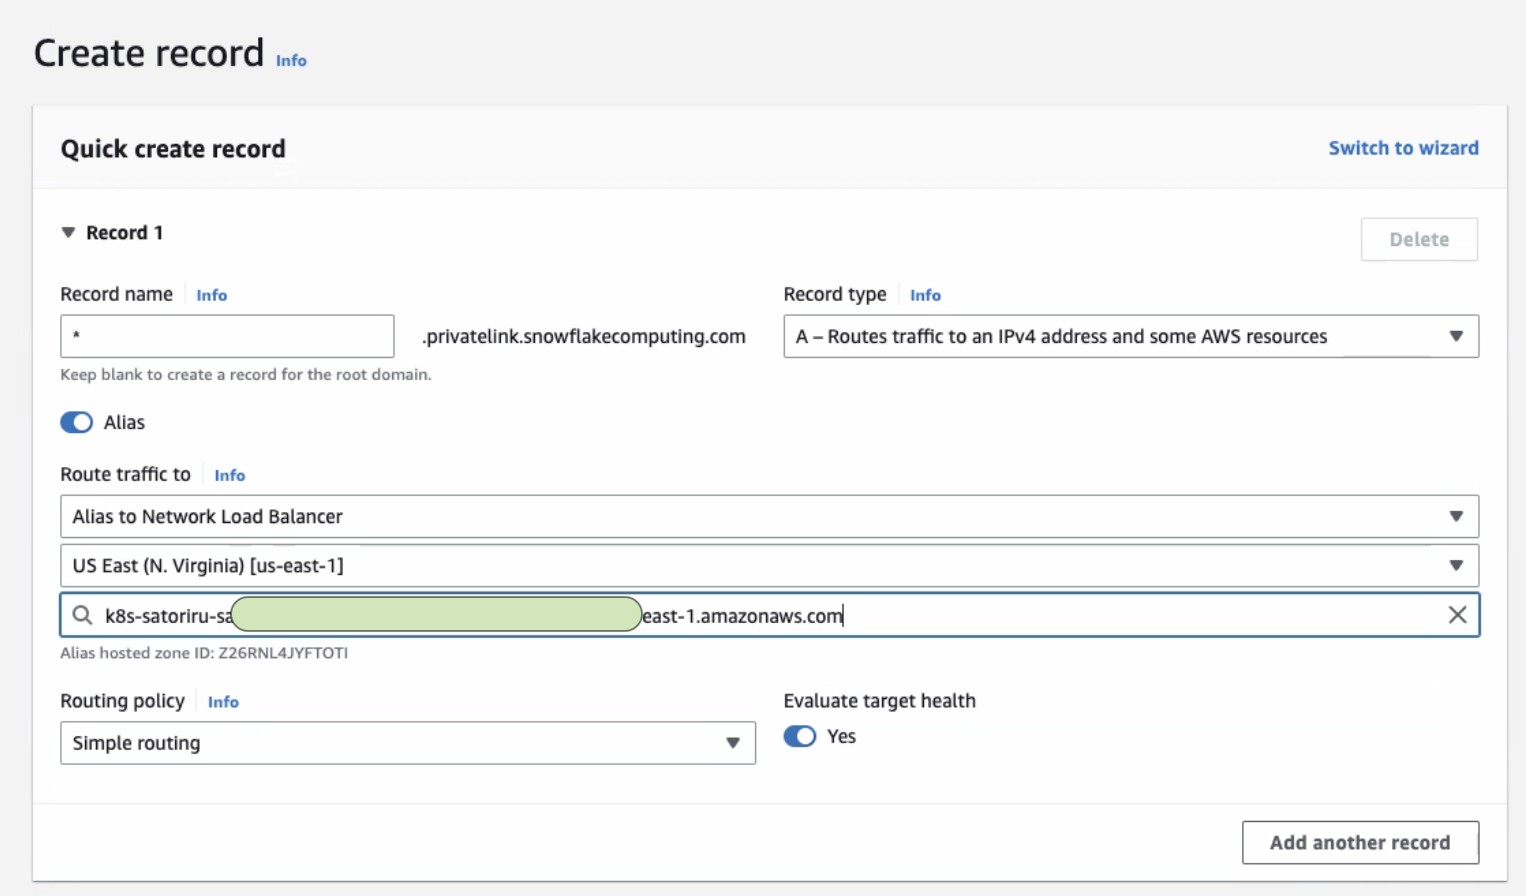
- By hand via command line, create a DNS zone on Route53 with a wildcard subdomain that has a CNAME record pointing to the load balancer address. For example:
*.dac1.us-east-1.a.p1.satoricyber.net. CNAME k8s-satoriru-satoriru-b8321e97a-3790e137d5d9ef3c.elb.us-east-1.amazonaws.com.
- Or in AWS, navigate to "Route53", then "hosted zones", and in your hosted zone, create a NEW RECORD using the AWS alias feature - the alias method allows for entity changes to occur in the future without having to recreate the new DNS record. In the following screenshot we have created an entry that points to the NLB for the Satori DAC:
- Alternatively, your org may already have a private DNS server, in which case you should use Amazon's documentation here. For example, in step 1 of this documentation, where they reference an EC2 instance for resolving DNS resolution, you would instead be referencing the NLB of the Satori DAC.
In all of the above cases, The DAC and its DNS should now be set up in order for you to begin adding your first data store.
Additional Information about Fargate Based EKS
Fargate based clusters are supported by Satori.
The provisioning of persistent volumes in Fargate clusters is limited to EFS and requires the pre-installation of the EFS CSI driver.
Installing the EFS CSI Driver
To install EFS CSI driver on your Kubernetes cluster, perform the steps detailed in the AWS Amazon EFS CSI User Guide.
AWS currently does not support dynamic provisioning of EFS volumes for Fargate pods. EFS file systems and access points must be created prior to the Satori deployment. The EFS IDs and access point IDs must be defined in the Satori helm chart values.yaml.
For more information on EFS dynamic provisioning go to the Amazon Containers - Dynamic EFS CSI Provisioning Blog

Upgrading Satori CH DAC
To upgrade your Satori CH DAC and enjoy the latest features, fixes and security improvements go to the Upgrading Satori section.